
Digital Multimeter with 42" Long Test Leads - LED Display
(2 reviews)
Price: $19.81
In Stock
Digital Multimeter with 42" Long Test Leads - LED Display
Item # PT89ZR
Retail:$49.66
Our Price: $19.81
You Save: 60%
In Stock


Need help with installation?
Locate installers near me- All Info
- Reviews (2)
- Q & A (0)
- Videos (1)
- Photos
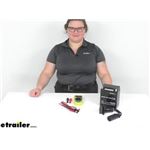
Performance Tool Electrical Tools - PT89ZR
- Multimeter
- Testers
- Yellow
- Performance Tool
- Safely troubleshoot a variety of automotive, household, and shop electrical circuits
- Test electrical components for faulty wiring and voltage
- Verify voltage on engine sensors, ignition, fuel systems, and charging systems
- Large digital LED display with UL-listed leads and probes
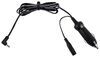
- Test leads are 42" long
W2969 Performance Tool Digital Automotive Multimeter
Installation Details


Video of Digital Multimeter with 42" Long Test Leads - LED Display


Videos are provided as a guide only. Refer to manufacturer installation instructions and specs for complete information.

Video Transcript for Review of Performance Tool Tools for Wiring - Digital Multimeter - PT89ZR
Ellen: Hey, everybody. I'm Ellen here at etrailer.com, and we're going to take a quick look at the Performance Tools digital multimeter. This is something that's really handy to have any time you're doing any kind of electrical job, or you're trying to test out any wiring, maybe do some troubleshooting with some wiring that's gone bad, you want to test out your battery, really anything along those lines. So a lot of times these are just something that's handy to have in your toolbox for any of those sort of instances.inaudible 00:00:25 about this is that it does give you a pretty big digital display that makes it easy to see what's going on. You get the leads that are about 42 inches long, so should be plenty of space, or plenty of length to get connected to whatever you want. And then there's also the included attachments that have a little alligator clamp, so that makes it easy, especially for testing out a battery without having to hold the little prongs over it the whole time.
So let's take a closer look and kind of run through some of those basic tests that you might end up doing.So here's our little guy, we've got a little kickstand at the back, makes it easy to just set this on a surface, set it on your trailer, on the floor, and we'll still be able to see what's going on. I'm going to hook up my leads here, they are color-coded so it makes it easy to remember what goes where. Got a couple little ends going over the prongs here. You'd probably end up losing these, honestly, but they do kind of help protect these. They are a little bit sharp, so if you've got these in a toolbox, it's kind of nice to have the caps just to keep them from ending up in your hand.There's also a couple of caps going over these ends, which I doubt you'll ever use, unless you're pretty meticulous about taking things apart and putting them away.
I'm just going to connect this up here. Most folks like to just keep the leads attached, makes it a little easier, so you're not having to take things apart every time. I'm going to put my alligator clamps over so we can test out our battery first. You don't have to, of course, you can just put the prongs over and it's not really too hard. You just want to make sure if you are going to use these, the inside there, this might be kind of hard to see, there's a little sleeve that that prong needs to fit into.
So just want to line that up to make sure it makes good contact all the way around.To turn this on, you just need to turn the dial away from the off position. So I'm going to turn it around to the 12 volt DC portion so I can test out my battery here. Swing those guys over and then set up my little kickstand there, and then just want to match the leads to my battery. We got red going to positive, black going a negative. And you can see our display showing what's going on there, so about 12 volts, that's what we should expect to get out of this.
Now there is a hold button, it's going to be that yellow one kind of on the left-hand side, to freeze the display at whatever it's reading out. Sometimes on other multimeters, if you press that, it'll freeze it at whatever the highest rating is. But this, it's just going to freeze it at whatever it is at the time on the screen, so that's something to keep in mind.To reset it, just press it again. I've run into this, though. I'm not a huge fan of the way this functions on these multimeters, because if you don't have it connected, maybe you don't realize that you have the hold button pressed, so if you try to go and use it, it's still at zero, and it could be a little confusing. It might make you think that there's something wrong with the multimeter, but it's just that that hold is on. So as soon as we press it again, it's going to give us our true reading, but that's just something to keep in mind there.There is another multimeter available from Performance Tools that has a little bit bigger screen, and that at least does have a little indicator to let you know when the hold is on, which I kind of like, just so that you can, if something's going on and you don't realize the hold is active, it gives you a visual cue. But again, if something's going on wrong or you're just not getting a readout, or it's not changing, press that hold button and see what happens, and that should make it pretty easy.Another common way to use this is to test out wiring functions, so if you we're to plug this in and then you want to test what each port is to make sure you get things wired up, this would be another way to do that. So you'd have current going through, and then I think usually this guy is the ground, and then you'd want to run through all the functions and test out what goes where, so that's a pretty common way to do it. It does give you pretty long lead, so it makes it easy to fit that into any kind of wiring plug and get connected to make sure that you can test things out, do your troubleshooting and what have you.So all in all, this is a pretty standard multi-meter. As I mentioned, there are other couple available here at etrailer.com. I'd say this is kind of the middle of the road one we have. Here's continuity, it does give you an audible alert. So if you want to test a fuse or something like that to make sure that there's continuity, you can use that function. It does come with instructions so that you know what all those functions are and kind of give you the tutorial of how to use it. But all in all, this one is probably the nicest, just because it is still a digital display so that makes it easy to see what's going on. But it's also pretty compact, so if you want something just a little bit smaller than the other ones, this is a pretty good option. And it does still give you those alligator clamp attachments if you want to use those to make it a little bit easier to test out something like a battery.That's pretty much all there is to it for our quick look at this digital multimeter. I hope that this has been helpful in deciding if this is the right one for you. We do have a lot of other wiring, trailer and RV accessories available here at etrailer.com, so be sure to check them out. Thanks for watching.
Customer Reviews
Digital Multimeter with 42" Long Test Leads - LED Display - PT89ZR
Average Customer Rating: 5.0 out of 5 stars (2 Customer Reviews)
by: Neil 09/11/2022
by: Judith 10/02/2021
2
2
See what our Experts say about this Performance Tool Electrical Tools
- Lippert Power Stabilizer Jack Not Working ProperlyYour Lippert # LC298707 Electric Stabilizer Jack is also known as the "PSX1" jack. There are a few possible issues at hand and with a bit of testing we can probably narrow in on the malfunction. First I have attached a wiring schematic for this system. Note that there should be an inline fuse between the battery and the switch. Verify that the fuse is not blown using an electrical tester like the Performance Tools # PT89ZR. If you have power there, then trace the power to the extend/retract...
view full answer...
- Troubleshooting An EverChill WD-282FWDC RV Refrigerator That Wont CoolThe Everchill RV Refrigerator w/ Freezer - 10.7 Cu Ft - 12V # 324-000119 requires at least 11.5v DC to properly work. You can use a voltage meter # PT89ZR to check the voltage running to the outlet and if you're getting less than 11.5v DC you'll need to increase the gauge of your wiring running from the battery to the outlet. I've attached a chart to help you determine the correct wire gauge for your needs. If you are getting enough voltage to properly run the fridge then you will need...
view full answer...
- How to Test a Brake Controller to See if it is Putting Out the Correct VoltageThere are several ways to test a brake controller. Since you want to check for voltage you would need a multi-meter, # PT89ZR, if you do not already have one. First, you need to test the voltage at the controller. Set the controller to maximum output. Then sever the blue wire several inches from the back of the controller. Set the meter to test for voltage. Test the end of the blue wire coming out of the controller while fully applying the manual override. You should be getting around...
view full answer... - Troubleshooting New Everchill RV RefrigeratorThe Everchill RV Refrigerator w/ Freezer - 10 Cu Ft - 12V - Stainless Steel # 324-000119 will run off of 12v but it appears the power converter is working the since the fan is running. Since we know the power is getting to the unit, I recommend checking the temperature dial. You will want to crank that gauge up on the fridge and freezer to tell the compressor it needs to kick in to cool the unit. It needs to be able to sit for hours without being opened to allow it to cool properly. If...
view full answer... - Checking Electric Brakes For Proper Voltage in SystemThe voltage at the black wire running into your controller should be at 12-13 Volts when checked with a multimeter like # PT89ZR. When checked at the 5 o'clock pin on your 7-way with the manual override lever engaged and with the controller set to max output it should read 12 Volts. At your brake magnets, it should read 11-12 Volts. If it is less then you will need to check your ground connections to ensure bare metal to metal connection and also check your brake magnet power wire. ...
view full answer... - Troubleshooting Thomas Payne Recline Power Issue Since your Thomas Payne Recliner has no power for any function, I recommend first plugging something into the outlet to make sure that it is properly running and is not the issue. I would then check the cup holder # 195-387597 and the wiring connection because that controls all the functions as a built in wired remote to the control box. Then I would check the connections to the control box # 195-387596. Finally I would check the 12V power cord # 195-387595. There are no external fuses...
view full answer...
- Recommended Replacement For An Inteli-Power PD9280 Converter Charger Yes, the Progressive Dynamics Inteli-Power RV Converter and Smart Battery Charger # PD9280A would be an exact replacement for your PD9280 converter. If you weren't just going to replace it and were going to troubleshoot the issue I recommend checking the output of the converter. It could be that the internal Charge Wizard is bad and not correctly reading the charge of your battery and thus sending more power than necessary to charge your battery. To test the output of the converter you'll...
view full answer... - Troubleshooting An Everchill RV Refrigerator That Freezes Up If your Everchill RV Refrigerator w/ Freezer # EV77FR is freezing up then I have the following troubleshooting recommendations: 1. First you'll need to thaw out the drain line. Turn off the power running to the fridge and leave the doors open so that the ice will melt. Once the ice is melted you can remove the lower back panel to gain access to the drain line and can ensure that it's clear using a pipe cleaner brush. 2. Check the temperature settings and lower them. 3. Check the ground...
view full answer... - How to Test Progressive Dynamics Converter OutputSince you've already checked the input voltage for your Progressive Dynamics converter the last thing for you to do is check the output voltage. If you don't get any output voltage then you'll want to replace the converter. We have a variety of replacement converters to choose from and since your Progressive Dynamics unit lasted 20 years I'd say stick to that brand. The 60A part # PD9160A is your best option which we have confirmed with Progressive Dynamics in the past. But first things...
view full answer...
- How To connect An Advent Air AC System With 1 Furnace Wire To A 2-Wire FurnaceTypically if there are two wires running from the furnace to the AC system then it means that the furnace has power already connected to it and it sends that through one of the wires up to the AC until the system calls for heat, at which point the relay will close and send power back to the furnace through the other wire. You'll want to connect the brown and white wire from the controller # ACRG15 to the other wire send power back to the furnace. To determine which wire is which you can...
view full answer... - One out of Four Trailer Brakes Does Not Work with Brake Controller but Does with Break Away SystemYou will need to make sure that all of the grounds for the brakes and the break away system are attached to clean and corrosion free bare metal surfaces. Inspect all of the wiring to make sure there are no loose or frayed wires. And make sure that the trailer connectors on the vehicle and trailer are clean and free of corrosion inside and out. To check to see if the brake controller is putting out enough power adjust it to the maximum level. Then use a multimeter such as # PT89ZR to test...
view full answer... - Troubleshooting Dimly Lit Tail Light Circuits on a Tekonsha 7-Way Emulator with 2002 Toyota TundraIf the Tekonsha 7-Way Trailer Emulator # 6562 that you referenced is picking up a small amount of voltage then that issue is coming from your 2002 Toyota Tundra and not the trailer. Some vehicles will have a small amount of voltage available on certain tail light circuits. If the tail lights of your trailer seem to work when connected to your vehicle then I would not let this bother you. If you are still concerned you could take a multimeter like our part # PT89ZR and test to see how much...
view full answer... - Troubleshooting OL Code on a Prodigy P2 Brake Controller on a 2014 Toyota Tundra LimitedThe OL code that you are seeing on your Prodigy P2 brake controller indicates that the brake controller is seeing an overload. Possible causes for this are a short on the electric brake wire or a poor ground connection. The first and easiest step is to inspect the trailer connector on the truck and trailer for any corrosion. If you see any green or white residue on the pins, that could indicate that corrosion has spread into the connector as well. You will want to repair or replace the...
view full answer... - Possible Causes for Dim Trailer LightsMost often the root cause for issues with trailer lighting is a weak ground. Strange as it may sound, a loose or rusty/corroded ground can cause a vehicle's trailer wiring harness to badly misbehave and shut down some functions. It may also just limit the amount of current that can flow to the lights and this will result in dim illumination. The easiest way to check the trailer ground is to disconnect it from the vehicle and apply 12V power (from a well-charged 12V battery) directly to...
view full answer... - Troubleshooting Wiring Harness That Stops Working Properly When Running Lights Are OnThe issue with your running lights causing the brake and turn signal to not work sounds like a common grounding problem that occurs often. Since the running lights remain on continuously they will draw more power than blinking turn signals or brake lights that are typically on for only a moment. This higher power draw is why those other functions can fail when you put on the vehicle headlights. The solution is usually very simple and easy. What you want to do on both the vehicle and on...
view full answer... - Troubleshooting Timed Brake Controller Wiring And Bench Test ProcedureYou could have a bad connection on your Draw-Tite Activator Trailer Brake Controller 5100. Since this is a timed brake controller the power going to the brakes will vary based on how long the brake pedal is pushed. The red wire is the signal that comes from the brake pedal switch to tell the controller when to brake. You will need to check that all the other wires have a good connection and not damaged. The black wire is your main power wire. Depending on your vehicle this will either...
view full answer... - Trailer Brakes Have Stopped WorkingThere's a number of possible issues to take a look at with trailer brakes not working. You will need to find out if the issue is on the brake controller, tow vehicle, or trailer. To test the brake controller, sever the blue wire a couple inches from the back of your controller. Then use circuit tester # PTW2979 to test the end of the blue wire coming out of the controller. It should only have power when you apply the manual override; if it shows power at idle then there is an issue with...
view full answer... - Troubleshooting Picture Issues With Furrion Vision S Sidemarker Cameras Since the rear camera is functioning correctly it sounds to me like the side cameras of your Furrion Vision S Wireless RV Observation Camera System w/ Side Marker Light Cameras # FCE48TASL-05 might not be getting 12v. I recommend unmounting them and testing the power wire with a multimeter # PT89ZR and seeing if you have a full 12v to the cameras. You'll need to prick the tester leads into the wires to get an accurate reading and can then cover the holes with some electrical tape. If...
view full answer... - How To Wire An Advent Air AC System To A Two-Wire Furnace Typically if there are two wires running from the furnace to the AC system then it means that the furnace has power already connected to it and it sends that through one of the wires up to the AC until the system calls for heat, at which point the relay will close and send power back to the furnace through the other wire. You'll want to connect the brown and white furnace wire from the controller # ACRG15 to the other wire send power back to the furnace. To determine which wire is which...
view full answer... - Potential Causes for Overheating Trailer Brake DrumsTrailer breakaway batteries are usually rated for 5-amp-hours and are designed to keep your four brake assemblies engaged for 15-minutes in the event of an accidental disconnect. The only way the breakaway battery could heat up your drums is if it kept the brakes engaged as you drove. In the same way, if there were a short in the vehicle or trailer wiring that somehow let your 12V power feed reach the brake circuit, which would also keep the brakes engaged. Either way you would probably...
view full answer... - Troubleshooting Lippert Landing Gear That is Giving an LF Error and Jacks Will Not Fully ExtendI contacted the manufacturer with the error code and issues you are having and they provided some troubleshooting options that I have included here for you. The LF jack error means the system lost communication with the jack during the process. We would suggest checking your battery voltage after disconnecting from all shore power, fuses in the back of your controller, and the harness from your jack to the controller. To clear the error, you will want to extend all jacks a minimum of...
view full answer... - Are Replacement Switches Available for the Lippert Smart JackI may have a solution for you, but I was able to reach out to my tech contact over at Lippert and he says that the switch on the Lippert Smart Jack Electric Trailer Jack w/ Footplate - A-Frame - 22-1/2" Lift - 3.5K - Black # LC643589 is not a replaceable part. For that reason, if your Smart Jack is not still covered by the 1 year warranty on this part you will need to replace it. You may first want to make sure that there isn't an issue with the connection to the battery if you haven't...
view full answer... - Troubleshooting Tekonsha Prodigy Brake Controller With Drag At Setting B3The button on the right on the Tekonsha Prodigy is the Boost button. The boost levels are pre-set based on how much the trailer weighs in comparison to the tow vehicle. For example, by pressing the button once, it will display what the current boost level is. If you see ".c" that means the boost is off. If you see ".c." (with the second dot) that means it is on. Every press of the button changes the boost level up to b.3. A boost setting of b.1 is for trailers that weigh less than the...
view full answer... - Troubleshooting Hopkins Reliance Brake Controller on 2008 GMC Sierra 1500The first suggestion I have is to replace the Hopkins Reliance brake controller, which despite its name is an unreliable brake controller, to say the least. You can still get an economical brake controller that is far more reliable with the Brake EVN # TK63VR with Brake Control Harness # 20127 for your 2008 GMC Sierra 1500. In regards to the issue you are having, an E1 code on the Reliance means a trailer is not connected and there are a number of potential issues you will need to troubleshoot...
view full answer...
Do you have a question about this Electrical Tool?
Info for this part was:

Installed by:
Kathleen M

Updated by:
Wilson B

Written by:
Matthew S

Edited by:
Daron K
At etrailer.com we provide the best information available about the products we sell. We take the quality of our information seriously so that you can get the right part the first time. Let us know if anything is missing or if you have any questions.
Product Experts Available Now!
Call 1-800-940-8924
Thank you! Your comment has been submitted successfully. You should be able to view your question/comment here within a few days.
Error submitting comment. Please try again momentarily.